DIY Eyelash Extension Kit - A Guide to Applying and Removing Lashes
Submitted by: John Smith Save to Instapaper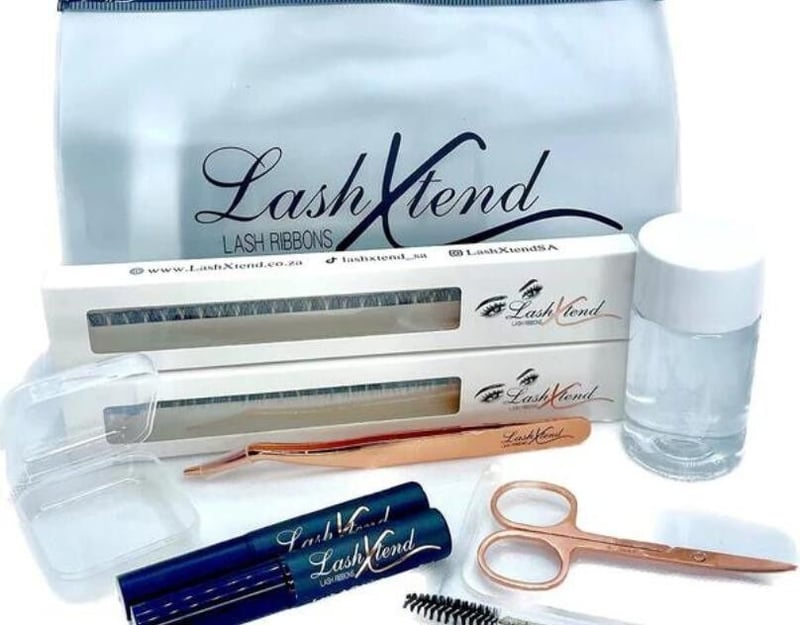
If you're someone who wants longer, fuller lash extensions without breaking the bank, DIY eyelash extensions may be the solution for you. With a DIY eyelash extension kit, you can have the look of professionally applied extensions in the comfort of your own home. In this blog post, we'll go over each item included in the LashXtend kit and how it's used in the process of applying and removing lashes.
What's Included in the Kit?
The LashXtend Queen lash extension kit comes with everything you need to get started with DIY eyelash extensions. Here's what you'll find in the kit:
2x LashXtend lash ribbons: These are the lashes that will be applied to your natural lashes. They come in a ribbon that can be cut to the length you want.
1x Applicator: This is the tool used to pick up the individual lashes from the ribbon and apply them to your natural lashes.
1x Lash glue: This is the glue used to attach the individual lashes to your natural lashes. It's important to use a high-quality adhesive, like the one included in the LashXtend kit, to ensure the extensions stay in place for as long as possible.
1x Lash remover: This is used to safely remove the lashes when it's time to take them off. Using a special remover, like the one included in the LashXtend kit, is important to avoid damaging your natural lashes.
1x Scissor: This is used to cut the lash ribbon to the desired length.
1x Storage/cleaning container: This is where you can store the unused lashes and keep them clean for future use.
1x Lash pad: This is used to protect your lower lashes during the application process.
1x Lash Bath 50ml: This is a gentle, lash-friendly cleanser used to clean the lashes after application.
1x Branded travel bag: This is a convenient, stylish way to store and transport your LashXtend kit.Applying the Lashes
Here's a step-by-step guide to applying the lashes using the LashXtend kit:
Preparation: Before you start, make sure you have all of the tools and products you need within reach. You'll also want to make sure you have good lighting and a comfortable, well-lit space to work in.Cut the lash ribbon: Use the scissors to cut the lash ribbon to the desired length.
Apply the adhesive: Use the applicator to pick up a small amount of adhesive and apply it to the individual lashes. Be sure to avoid using too much adhesive, as this can cause the lashes to clump together.
Apply the lashes: Use the applicator to pick up the individual lashes from the ribbon and apply them to your natural lashes, starting at the base and working your way out.
Repeat: Repeat this process until you've applied the desired number of lashes.Clean up: Use a Q-tip to clean up any excess adhesive that may have gotten on your skin or lashes.
Aftercare: Use the Lash Bath to clean the lashes and keep them healthy and clean.
Removing the Lashes
Here's a step-by-step guide to removing the lashes using the LashXtend kit:
Clean the area around your eyes thoroughly to remove any makeup or oils.
Soak a cotton ball or pad in the Lash Bath solution provided in the kit and gently apply it to your lashes. This will help to dissolve the adhesive and make the lashes easier to remove.
Wait for a few minutes until the Lash Bath solution has fully absorbed and softened the adhesive.
Use the applicator provided in the kit to gently lift the lashes from your eyelid, starting from the outer corner and working your way inward. Be sure to work slowly and carefully to avoid pulling or damaging your natural lashes.
If you have trouble removing the lashes, you can also use the Lash Remover provided in the kit to help dissolve the adhesive. Simply soak a cotton ball or pad in the remover and apply it to your lashes. Wait for a few minutes and then use the applicator to gently remove the lashes.
It's important to note that removing eyelash extensions can be a delicate process and should be done with care to avoid damaging your natural lashes. If you're not confident in your ability to remove the lashes yourself, it's best to seek the help of a professional.
After removing the lashes, be sure to clean your eyes and lashes thoroughly with a gentle cleanser to remove any residue from the adhesive and Lash Bath solution. You can also use the Lash Pad provided in the kit to gently clean your lashes and help them return to their natural state.
By using the LashXtend kit and following these steps, you'll be able to safely and effectively remove your eyelash extensions and keep your natural lashes healthy and protected.
This articles was first published at https://www.lashxtend.co.za/blogs/lash-tips-news-advice/diy-eyelash-extension-kit-a-guide-to-applying-and-removing-lashes
As a blogger who is dedicated to providing helpful information, I understand the importance of credibility when it comes to the sources of information. Rest assured that the information I share is backed by credible websites that have been vetted for their accuracy and expertise in their respective fields. By using only reliable sources, I ensure that my clients receive the most accurate and up-to-date information possible. You can trust that the information I provide will help you make informed decisions and take actions that will positively impact your life.
Latest Press Articles
- Empowering ZA's Electricians - The Collab Force of TDMI and Nearby Electrician
- LashXtend Wins Big - ZA Brand Takes Home Top Beauty Award for DIY Lash Innovation
- Touchwood - The South African Brand Turning Nature into Timeless Luxury
- The Ultimate Guide to Popular Vape Products
- Premium Joint Supplements for Dogs in South Africa - A Comprehensive Guide
- Lash Like a Pro - The Ultimate DIY Guide to False Lashes, Kits & Extensions at Home
- Beyond the Band - How Ashes, Dinosaur Bones & Personal Tokens Are Redefining Keepsake Rings
- Everything You Need to Know About Electrical Courses in South Africa
- The Dog Supplement Revolution - What Every Owner Needs to Know
- The Stingray – Abalone Shell and Guitar String Ring - A Symbol of Rock, Adventure and Style
- Lash Perfection at Home - Unlock the Secrets to Stunning Self Done Lashes
- Ultimate Guide to Vaping - Starter Kits, Disposable Vapes, Juice, Mods, and Top Brands
- How Cybersecurity as a Service Enhances Business Protection
- The Science Behind Pet Supplements - What Research Says
- Transform Your Look with Professional Adult Angel Wings
The Pulse Updates
- Xlink Crowned Technology Company Of The Year At The Africa Tech Week Awards 2025 (June 5, 2025)
- Celebrate International Day Of Play With The Weirdest (and Most Wonderful) Toys Of 2025 (June 4, 2025)
- Switching On The Future - Landmark Electricity Expo Comes To Joburg (June 3, 2025)
- Timeless, Bold, And Distilled With Care - Just Like Dad (June 2, 2025)
- New Report Reveals Msme Funding Realities In South Africa – And What Must Change (May 30, 2025)